
Adobe XD to Shopify conversion follows the same fundamental process as any design-to-Shopify workflow, but with XD-specific tooling and some unique challenges around design handoff. I’ve built Shopify themes from XD files dozens of times — primarily for clients in the enterprise space who’ve standardized on Adobe Creative Cloud. This guide walks through the complete workflow from receiving an XD file to launching a live Shopify theme.
1. Adobe XD to Shopify: What the Conversion Process Involves
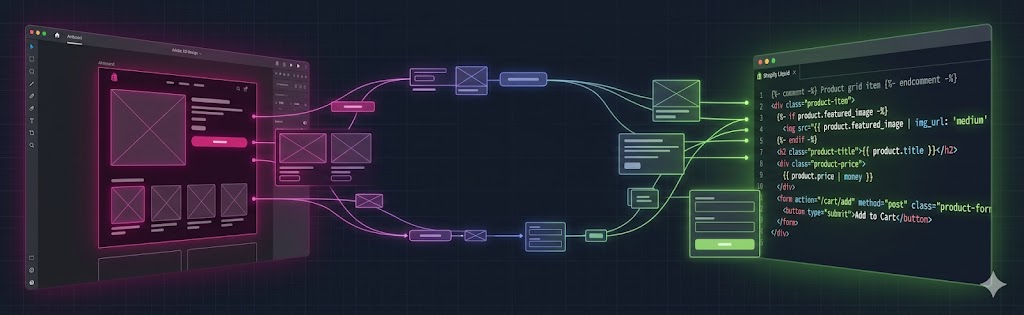
Converting an Adobe XD design to a Shopify theme means translating every visual element in the XD artboards into Liquid templates, CSS styles, and JavaScript interactions that Shopify can execute. The XD file defines how the store should look; the developer’s job is to make it work as a dynamic, content-managed Shopify theme.
The process has six core phases: reviewing and auditing the XD file, exporting assets, mapping XD components to Shopify’s section and block architecture, converting typography and color tokens to Shopify theme settings, building responsive templates from XD artboards, and then testing across devices and browsers.
XD-specific considerations: XD uses Components (equivalent to Figma’s Components) for reusable design elements. XD’s Repeat Grid feature creates data-driven lists. XD’s States define hover, focus, and active variants of components. All of these need to be understood before development starts, as they communicate important intent about interactive behavior.
2. Exporting Assets from Adobe XD for Shopify
Asset export from XD is handled through the Export panel. For Shopify development, I export in the following way:
- Icons and logos: Always export as SVG. XD’s SVG export is clean and production-ready. Name files descriptively:
icon-cart.svg,logo-primary.svg,logo-white.svg. - Photographs and hero images: Export at 2x resolution as WebP (if available in your XD version) or high-quality JPEG. Shopify’s CDN handles format negotiation and resizing, so upload originals at full resolution.
- Decorative graphics and illustrations: Export as SVG where vector-based, or PNG with transparency where needed.
- Background textures: Export at 1x and 2x. For Shopify, these typically go into the theme’s
/assets/folder and are referenced via Liquid’s{{ 'texture-grain.png' | asset_url }}.
Use XD’s “Mark for Export” feature (right-click a layer or group > Mark for Export) to flag assets before batch exporting. This prevents accidentally exporting intermediate layers that aren’t intended as standalone assets.
3. Mapping XD Components to Shopify Sections and Blocks
XD Components map directly to Shopify’s section and block architecture. An XD Component that represents a product card becomes a Shopify section block. An XD artboard for the homepage hero becomes a Shopify section. This mapping is the most important architectural decision in the conversion process.
Section Mapping Examples
- XD “Hero Banner” component → Shopify
hero-banner.liquidsection with settings for heading text, subtext, background image, CTA button label and URL - XD “Featured Collection” artboard → Shopify
featured-collection.liquidsection with a collection picker setting and products_to_show range setting - XD “Testimonial Card” component → Shopify block within a
testimonials.liquidsection, with text, author name, author image, and star rating settings - XD “Rich Text” component → Shopify core
rich-textsection (no custom build needed — use Shopify’s built-in)
Not every XD component needs a custom Shopify section. Shopify’s default sections cover many common patterns (rich text, image with text, video, featured product). Custom development should focus on components that are unique to the design and can’t be achieved with built-in sections.
4. Converting XD Typography to Shopify Theme Settings
Adobe XD’s Character Styles (the typography system) need to be translated into Shopify theme settings. Shopify’s theme settings JSON (config/settings_schema.json) supports font picker settings that let merchants choose fonts from Shopify’s font library.
For a custom XD design with specific fonts, the approach depends on the license: Google Fonts can be loaded via Shopify’s font picker ("type": "font_picker" setting). Licensed fonts (Adobe Fonts, premium typefaces) are loaded via self-hosted font files in the theme’s /assets/ folder with @font-face declarations in the theme CSS.
/* In theme.liquid, reference font settings */
{%- assign heading_font = settings.heading_font -%}
{%- assign body_font = settings.body_font -%}
{{ heading_font | font_face }}
{{ body_font | font_face }}

/* In theme CSS, use the font variables */
:root {
  --font-heading-family: {{ heading_font.family }}, {{ heading_font.fallback_families }};
  --font-heading-weight: {{ heading_font.weight }};
  --font-body-family: {{ body_font.family }}, {{ body_font.fallback_families }};
}
Map every text style from XD’s Character Styles panel to a CSS class and document the mapping. This becomes the typography reference for the entire project.
5. Responsive Design: XD Artboards to Shopify Breakpoints
XD designs typically come with multiple artboard sizes: desktop (1440px or 1920px), tablet (768px or 1024px), and mobile (375px or 390px). Each artboard shows the design intent for that viewport. The developer’s job is to build CSS that smoothly transitions between these states using media queries.
XD doesn’t generate responsive CSS automatically — that’s the developer’s responsibility. I use the artboards as reference points for the breakpoints I define in CSS, but I also check behavior at all sizes between artboards. A layout that looks great at 1440px and 768px might break at 900px if the developer hasn’t thought through the intermediate state.
For Shopify specifically, test on an actual iOS device (iPhone 14 or 15 Pro, which has a 393px display) and on Android. Shopify’s checkout is served from Shopify’s servers even in custom themes, so checkout responsiveness is handled by Shopify — but every other template needs thorough mobile testing.
6. Adobe XD vs. Figma for Shopify Development in 2026
This comparison comes up on nearly every project scoping call with clients who have existing Adobe XD files but are wondering whether to move to Figma for future work.
Figma’s practical advantages for Shopify development: Variables (released 2023) map directly to CSS custom properties and Shopify theme settings — you can export a complete design token set from Figma Variables. Dev Mode provides a purpose-built developer inspection interface with CSS snippets, spacing annotations, and asset exports in one place. Figma’s community components and published plugins are more extensive and more actively maintained. Real-time collaboration means designers and developers can work in the same file simultaneously.
Adobe XD’s remaining advantages: Deep integration with other Adobe CC apps (Photoshop, Illustrator, After Effects for motion specs). Familiar interface for teams already using Creative Cloud. Some enterprise design teams prefer XD’s presentation and prototype features for client review sessions.
My recommendation: if you’re starting a new project, use Figma. If you have existing XD assets, there’s no need to migrate — XD files convert to Shopify themes just as effectively. If you’re considering our Adobe XD to WordPress service, the same workflow applies with WordPress instead of Shopify.
The XD-to-Shopify projects that stall almost always share one root cause: Component States were never walked through with the developer before build started. An interactive state — a hover, a drawer open/close, a conditional badge — takes 30 seconds to explain in person. It takes hours to reverse-engineer from a static artboard. Spend time walking through interaction intent at project kickoff, not during QA when it’s expensive to fix.
Frequently Asked Questions
settings_schema.json, build responsive Liquid templates from the artboards, then test across devices. The cleaner and better-documented the XD file, the faster the build.
shopify theme dev for a live local preview and shopify theme push to deploy). The CLI is preferred while building because it previews changes in real time; the zip upload is best for handoff or deploying a final theme.